Driving on the "Other" Side of the Road
by Robin Simpson
As an American, my first experience driving on the opposite side of the road was a little intimidating. However, my sense of adventure didn't stop me from giving it a go. What I've discovered after having driven thousands of miles in Britain, is that it is not only enjoyable, but it is a lot easier than we all can make it out to be.
THE BASICS
The first step to driving in Britain, is choosing your automobile. The best way to start - decide whether or not you feel comfortable driving a manual shift vehicle. For some people, especially on their first try, the thought of shifting with their left hand on top of thinking to stay on the correct side of the road, is simply just too much to handle. An automatic would be the obvious choice. However, keeping in mind that a standard shift rental tends to be cheaper, your wallet might just make that choice for you.
Where will you pick up your car?
If you're spending any time in London, not many people would recommend driving in the city, including me! Yikes! Besides, the public transportation system (i.e., the tube, buses, taxis, and the old favorite - your own two feet) is so advanced, I'm surprised anyone drives in London anyway! If you're going to be flying into London, or another large city, and you are going on to another location, you might choose to rent a car at the airport. Just keep in mind there are usually surcharges for this convenience.
If you find that the choice is possible, you may want to pick your car up at a train station or in town. Just explore your needs and make your decision from there.
Insurance is also a concern.
Most car rental companies offer a Collision Damage Waiver (popularly referred to as "CDW"). The CDW cover any and all damage that may happen to your vehicle, whether or not it is your fault. There may be a "deductible" for any damage, but there are usually extra coverage options that can lower this fee - sometimes to zero. Most State-side car insurance companies do not cover rental outside the United States.
Some travelers choose to use insurance offered by their credit card companies. Be aware, however; that if an accident occurs, any damage done to your vehicle or someone else's, may be charged to your credit card until the insurance claim can be settled.
Now that you have your car, know where you're picking it up, and you're covered for any collisions, what's next? The most important thing is getting to know your vehicle. Every car is different, so take a few minutes to familiarize yourself with the headlights, windscreen wipers, and any security features on your car. Don't be afraid to ask about a particular feature that you're unfamiliar with, so you're not caught far away from the rental agency and not know how to operate that feature.
Check thoroughly for any damage that may have already occurred on your rental that the company doesn't know about and have recorded. If, for instance, there is a scratch on the car that's not listed as "previous damage," the rental company is going to assume you're responsible for such damage and will charge you for it.
Remembering to ask the attendant at the rental desk to point you in the right direction, (i.e., how to get out of the car park, which way to get on the road to get to your first destination) is always a good way to start your holiday.
YOU'RE ON THE ROAD
Staying on the left side of the road is the easiest bit, especially since you'll be sitting on the opposite side of the car. The tricky part is remembering a few things that will make your driving easier and safer.
When coming to an intersection with a stop sign, most of the time there will be a dotted line and an inverted triangle across the road where you're expected to stop. Don't forget to yield to oncoming traffic, especially if you're turning to the right. Remember, your vehicle must cross traffic to make a right turn.
Speed limit signs are posted in measures of tens, not fives as they are here in the United States. They are circular in shape and are easily picked out. The road route signs are not normally marked in "North/South" or "East/West," they're mainly marked with a town or city that is in the direction you're traveling.
For instance, if you are in York and want to go North, you'd follow the road signs for Edinburgh, not for London. Of course, that's an exaggerated example, but it gives you a general idea.
This brings me to my very favorite part of driving in Britain.
THE ROUNDABOUT
There are more complicated ways to explain the navigation of a roundabout, and of course, more complicated roundabouts, but this is a basic explanation and should help you get started.
When I first tried to navigate roundabouts, I didn't care for them at all. That's before I understood how they work. Roundabouts are basically intersections, but ingeniously, the way they are designed, keep the flow of traffic moving at a constant pace. Some places in the United States have these, but they are referred to as "traffic circles." When you are approaching a roundabout, you'll see a large green sign. The signs have white lettering, have a diagram of the upcoming roundabout, complete with details about the roads that travel out from the roundabout. (I call them spider signs, you'll understand when you see one!). This sign will show you the direction that the different roads will take you, the name of the road (i.e., M1, A917, B2805), and you'll be able to tell which "exit" to take by counting them. Know BEFORE you get to the roundabout, which "exit" you need to take.
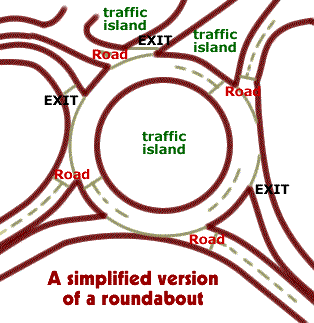
I've noticed roundabouts' secondary signs (those on the actual road you want to take) are sometimes missing. No doubt from misled travelers trying to find their way back onto the roundabout, a moment too late. Its handy to have a navigator to help you count to the exit you need to take. When approaching a roundabout, you'll need to slow your speed, and you may have to stop before entering. Yield to oncoming traffic approaching from your right. If you have oncoming traffic approaching from your left, run for cover! They're going the wrong way! As tempting as it may be, even if your turn would be easy to make, do NOT turn to the right on a roundabout. They are all one way, clockwise. If your turn is the exit closest to your right as you approach the roundabout, you must travel clockwise all the way around the circle to that exit.
UPDATE: I thought a bit of an audio-visual aid might be useful, so here is a rather staid but useful video put out by the Royal Automobile Club. It covers pretty basic roundabout strategy, but hopefully will help ease your nerves if you are concerned about tackling roundabouts for the first time.
STANDARD ROADS
Once you've successfully navigated a roundabout, perhaps you'll feel sure enough of your new talent to shoot out onto the motorway. Motorway driving is quite simple but there are a few tips to keep you in good spirits while you're speeding along. First of all, the "slow" lane is the outside (or in this case, the far left) lane. This is also the lane where you'll need to make your exits. Exits are very clearly marked and you'll have plenty of warning before your exit approaches.
I was pleasantly surprised to find just how good the roads are built. They are in superb shape and are easy to drive on. Few repairs have to be done in regular maintenance, since these roads are built so well from the beginning.
"A-roads" are primary roads - sometimes divided highways, sometimes just two way roads. They are the most numerous roads in Britain.
"B-roads" are secondary roads and even though they're not quite as numerous as "A-roads," they still provide a easily driven road system to get your to your destination. You'll find that "B-roads" can lead you into quaint villages and lovely peaceful towns.
My favorite roads to drive in Britain are what I fondly call "clear roads," because of the lack of represented colour in the Atlas. Sometimes these roads are only single track roads. These can be very fun to navigate, unless you're caught behind a lorry (truck) or a coach (tour bus). You don't have to worry about which side to stay on, unless you come to an oncoming vehicle. This is where knowing how to use a proper passing place comes in handy.
As you are driving on single track roads (which you'll mostly find in rural areas and mainly in the Highlands of Scotland), pay attention to where the wide spots are in the road. Some places are marked with handy signs (white with black lettering) that say, funnily enough, "Passing Place." Do NOT park in these spaces unless you can get completely off the road or its designated for parking. Parking signs will be large blue signs with a white "P" on them. It is very dangerous to park within a passing place, as most vehicles are not expecting a car to be planted there as they utilize it to make their way around oncoming cars.
When you come to an oncoming vehicle, one of you may have to reverse into the nearest passing place. On very narrow one lane roads, especially those that are frequently traveled, the passing places are quite close together. If timed well and done cautiously, both cars can pass simultaneously without stopping. If you can do this, without knocking off someone's wing mirror, then you've become an accomplished British driver!
Giving the car a rest
Whenever you're driving, eventually you have to stop. Then comes the issue of parking. You need to know where to and where not to pull your car over.
Double yellow lines in towns and villages are there to denote a "No Parking" zone. Don't park on double yellow lines. If you see a circular sign with either an "X" or a "slash" inside, you may not park in that space. Pay close attention to posted signs, and you should be able to avoid coming in contact with the local traffic warden.
Most towns (especially tourist towns) will provide a public parking area. These areas will sometimes require a "Pay & Display" ticket - which takes the place of the parking meters we're so fond of here in the States. Park your car, then go to the nearest "vending" machine. It will have full instructions, but here is a quick rundown.
Decide how long you will need to park (or at least a good estimation), put in enough coins (be sure to have coins BEFORE you park), and then push the big green button. Out will pop your ticket with the date, the time you purchased the ticket, and what time it expires, all noted on the ticket itself. The ticket will have a sticker on the back. Peel the sticker and place it on the inside of your driver's window or the windscreen (windshield) where the times and date are visible to the outside of the car.
It sounds complicated, but I assure you, it is quite simple. Just remove the ticket when you return to your car. Note that the times listed will be in 24 hour or military time - so if your ticket expires at two o'clock, it will be displayed as 14:00.
Unless you leave your car parked the entire time you have it rented, which would totally defeat the reason for having rented one in the first place, you'll need to add some petrol (gasoline). The stations are located in cities, towns, and villages, nearly everywhere. I've seen BP, Shell, and Esso, among others. Prices are listed in litres, so don't let the displayed prices fool you. It takes about five liters to fill a British gallon. You'll find that petrol is more expensive but you will also have noticed that the cars tend to get much better gas mileage than our cars do here in the States. That would also explain why you find so many small cars on the road ... and very few SUV's!
All that said, just remember to be courteous (its okay to pull over and let those twenty-five cars pass if you're driving is a bit pokey). Stay safe (obey traffic signals and posted signs). And don't forget the reason you're doing this .. you're on vacation! So relax, don't spend ALL your time in the car, and have some fun!
© Copyrighted by Robin Simpson, 2001 - All rights reserved
About the author:
Robin Simpson is an independent travel consultant who has researched Britain for many years and has traveled extensively all over the UK and bits of Ireland. Contact her at RobinsRambles@aol.com
roundabout image © David Ross and Britain Express